
Payments Setup Guide
This guide covers everything you need to set up and manage payments within the Total Drive app—from connecting your Adyen account to creating products your pupils can purchase.
Note: if you have been with Total Drive, less than 30 days, you will need to send a photo of your ADI/PDI license along with the photo side of your driving license to support@totaldrive.co.uk
Table of Contents
Payments Setup
Adding Categories
Adding Products
Payments Setup
This section walks you through connecting your Adyen payment account to start accepting payments through the app.
Getting Started:
Tap "Payments" in the Settings menu to begin the Adyen setup.
Tap "Setup Payment Account" to start the configuration.
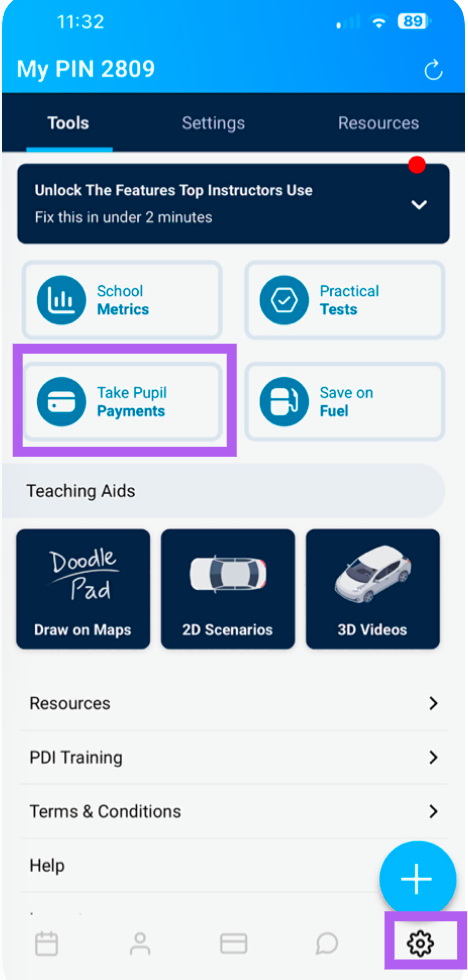
Configure Payment Settings:
Ensure "Take Payments" is toggled On.
Set the Service Fee slider to your preferred percentage.
Choose whether the service fee is paid by the Pupil or the Instructor.

Account Setup:
Fill in the required Account fields below the settings.
Tap "Manage Account" to proceed to the next step.

Payout Details:
Complete the three-step process to connect your bank account.
You'll need to provide your Account Number and Sort Code.
Upload supporting evidence, such as a bank statement, for verification.

Completion:
Once both sections are complete, a green tick will appear next to each.
You can now accept payments through the app.

Adding Categories
Before you can create products for pupils to purchase, you'll need to set up at least one category. Categories help organise your products (e.g., "Lessons," "Block Bookings," "Test Fees").
Getting Started:
Navigate to the Categories section within Payments.
You can either edit the default categories provided or create your own.
Create a New Category:
Tap the "+" icon to add a new category.
Enter a name for the category (e.g., "Driving Lessons," "Intensive Courses").
If you want the category to be visible to pupils, ensure the toggle is enabled.
Tap Save to confirm.


Adding Products
Once you've created a category, you can start adding products that your pupils can purchase through the app.
Getting Started:
Tap "Products" to view all available categories.
Select the category you wish to add a product to.
Tap the "+" icon to create a new product.

Product Details:
Fill in the following fields:
Title – A clear name for the product (e.g., "1-Hour Lesson," "Block of 10").
Duration – The length of the lesson or service in hours.
Price – The cost of the product.
Category – Assign the product to the appropriate category.
Gearbox – Ensure this is set correctly for the lesson type (Automatic or Manual).
Save Your Product:
Tap "Save" when you've completed all the fields.
Example:
For a "Block Package", set the price correctly and specify the total number of hours the package covers. Tap "Save" when finished.


Managing Products and Categories
Viewing Products Under a Category:
Tap the expand icon next to a category to see all products within it.
Editing or Deleting a Product:
Tap the expand icon again to reveal the options.
Select "Edit" to modify the product details, or "Delete" to remove it.


Tip: Well-organised categories and clear product names make it easier for pupils to understand what they're purchasing and reduce confusion at checkout. Take time to set these up thoughtfully.